Christmas Card #8 - Heat Embossed with Gold Powder
Thursday, August 13, 2015
Christmas #1
I know I'm a little early, but I am working on Christmas cards that I have made for consideration for the upcoming holidays. I mass produce one card for the season but make several to decide which one my husband and I like the best. So, here goes ... I am posting several for upload to Live Love Cards challenge.
Thursday, June 4, 2015
Mask-erade Day 5 Heat Embossing
I used my favorite Penny Black cake & wishes stamp to once again attempt Jennifer McGuire's VersaMark masking technique. I initially stamped this sweet little girl on water color paper using Versafine onyx black ink and then embossed in clear powder. I used my Distress Markers to color (I LOVE them) and then used my VersaMark Pen to go over the stamped image, again applied clear embossing powder and used my heat gun to set. I then used the distress mini ink pads (have I told you how much I like them?) to create the clouded sky and very light green for the grass. I gently wiped the image to remove the residue from my background ink and stamped the greeting with my Misti. I did learn that using my Micron ink to darken the "H" on my embossed balloon wasn't such a good idea -- it smeared, and I went over it with a yellow Copic marker. The blue bling underneath my birthday greeting is due to a little smear ... another opportunity to be flexible in my stamping!
Mask-erade Day 3 Retry
Okay, I just had to take another go at a similar card that I did a few days ago following the Day 3 Mask-erdade class. The first one was not well done since I had a combination of cut-out masking figures and then added a very fine coating of rubber cement. I failed to do a great job with either technique, so I put together another grouping and used the Fineline Masking Fluid before adding my cloudy sky and grass. I am happier with this version but not thrilled. I have (a lot) more practice in my future!
Sunday, May 31, 2015
Heat Embossing - Mask-erade Day 5
I replicated Jennifer McGuire's card that she made demonstrating heat embossing techniques for stamped images. Wow -- I love it! The VersaMark over my water colored balloons resisted the ink for the background -- and added a nice sheen in the process. I really like the clean margins on either side. Will definitely be doing more of this in the future.
Thursday, May 28, 2015
Mask-erade Day 3
This a first attempt at using rubber cement to protect my "neighbors" while adding the background. The rubber cement dried very quickly, which I like, but I had a difficult time insuring proper coverage since the cement is so clear. I started this yesterday -- Day 2 of the Mask-erade Class -- and cut out each figure for individual masks. A little labor-intensive, but I kept them for future use. I obviously need (a lot) more practice! I used the Penny Black 12 Days of Christmas stamp, Copics and Distress Markers.
Wednesday, May 27, 2015
Masking
This card was inspired by the Mask-erade class currently being held by Jennifer McGuire and others. I used post-it tape to fussy-cut several of the flowers to protect them when I added the surrounding leaves and background. I also masked off the area where the sentiment would go to give it more of a 3-D effect. I used my Distress Inks for the water color -- a work in progress. I used the AlteNew Vintage Roses stamp as well as the Simon Says Congratulations stamp for the greeting.
Saturday, May 23, 2015
Birthday Card
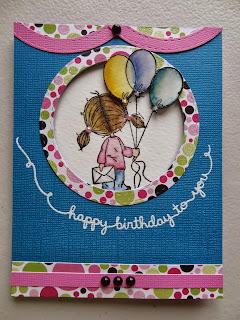
This image from the Penny Black Cake & Wishes set is just TOO cute! I water colored the little girl with my Distress Markers and then added lots of color around her for a happy, festive look.
3-D Card
I wanted to share this birthday card that I sent to a friend who loves flowers and beautiful cottages. This one was so easy to do and turned out much better than I had expected. I used a card from Hunkydory's Springtime collection, stamped the sentiment and then used my Lawn Fawn cutting dies to cut the picture into four squares. I then mounted them incrementally for a 3-D effect. Because the actual card was slick, my black VersaFine ink smeared. Fortunately, I was able to use the "happy" die cut from the Winnie & Walter Big Bold & The Happy stamp/die set to cover up the smear. I mailed this in a padded envelope and the recipient was quite pleased (and impressed) with her card. I love it when a plan comes together!
Water Color
I saw this design on Pinterest and loved it so much that I decided to try it with my new Tim Holtz Distress Markers. Of all the mediums I have tried thus far, I am most pleased with the ease in blending with these markers. I used water color paper for the image. The background was trimmed in gold sticky tape. I would have liked the message to show a little better, but I guess one learns by mistakes! I used the Altenew Vintage Roses stamp set. I was inspired by Darlene DeVries' video (Live Love Cards) that shared spectacular water color results using the distress markers.
Subscribe to:
Posts (Atom)


