Sunday, May 31, 2015
Heat Embossing - Mask-erade Day 5
I replicated Jennifer McGuire's card that she made demonstrating heat embossing techniques for stamped images. Wow -- I love it! The VersaMark over my water colored balloons resisted the ink for the background -- and added a nice sheen in the process. I really like the clean margins on either side. Will definitely be doing more of this in the future.
Thursday, May 28, 2015
Mask-erade Day 3
This a first attempt at using rubber cement to protect my "neighbors" while adding the background. The rubber cement dried very quickly, which I like, but I had a difficult time insuring proper coverage since the cement is so clear. I started this yesterday -- Day 2 of the Mask-erade Class -- and cut out each figure for individual masks. A little labor-intensive, but I kept them for future use. I obviously need (a lot) more practice! I used the Penny Black 12 Days of Christmas stamp, Copics and Distress Markers.
Wednesday, May 27, 2015
Masking
This card was inspired by the Mask-erade class currently being held by Jennifer McGuire and others. I used post-it tape to fussy-cut several of the flowers to protect them when I added the surrounding leaves and background. I also masked off the area where the sentiment would go to give it more of a 3-D effect. I used my Distress Inks for the water color -- a work in progress. I used the AlteNew Vintage Roses stamp as well as the Simon Says Congratulations stamp for the greeting.
Saturday, May 23, 2015
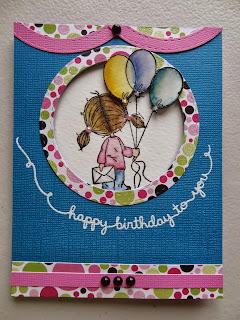
Birthday Card
This image from the Penny Black Cake & Wishes set is just TOO cute! I water colored the little girl with my Distress Markers and then added lots of color around her for a happy, festive look.
3-D Card
I wanted to share this birthday card that I sent to a friend who loves flowers and beautiful cottages. This one was so easy to do and turned out much better than I had expected. I used a card from Hunkydory's Springtime collection, stamped the sentiment and then used my Lawn Fawn cutting dies to cut the picture into four squares. I then mounted them incrementally for a 3-D effect. Because the actual card was slick, my black VersaFine ink smeared. Fortunately, I was able to use the "happy" die cut from the Winnie & Walter Big Bold & The Happy stamp/die set to cover up the smear. I mailed this in a padded envelope and the recipient was quite pleased (and impressed) with her card. I love it when a plan comes together!
Water Color
I saw this design on Pinterest and loved it so much that I decided to try it with my new Tim Holtz Distress Markers. Of all the mediums I have tried thus far, I am most pleased with the ease in blending with these markers. I used water color paper for the image. The background was trimmed in gold sticky tape. I would have liked the message to show a little better, but I guess one learns by mistakes! I used the Altenew Vintage Roses stamp set. I was inspired by Darlene DeVries' video (Live Love Cards) that shared spectacular water color results using the distress markers.
Subscribe to:
Posts (Atom)


